

I’ve always loved baking around Halloween — it’s the one time of year when creativity in the kitchen is just as important as taste. And out of all the spooky treats I’ve made over the years, nothing gets more smiles (and requests for seconds) than my Halloween sugar cookie friendly Frankenstein recipe. It’s fun, easy to customize, and simple enough for kids to help with, yet still impressive enough to steal the spotlight at any party.
Whether you’re planning a Halloween bash, a classroom treat, or just a fun weekend activity with the family, these Frankenstein sugar cookies are the perfect mix of spooky and sweet. Let’s dive into everything you need to know — from ingredients and baking tips to decoration ideas and storage advice.
Why Try a Halloween Sugar Cookie Friendly Frankenstein Recipe?
What makes this particular recipe so beloved is its simplicity and creativity. You don’t need advanced decorating skills or fancy baking tools — just a few pantry staples and some imagination.
- Kid-friendly: Even young children can help mix, roll, and decorate.
- Customizable: Switch up colors, expressions, or sprinkles for endless variations.
- Make-ahead option: Bake and freeze cookies ahead of time, then decorate the day of your event.
- Perfect for parties: They’re sturdy enough to pack and share, and they make a fun conversation piece on dessert tables.
The best part? You can use either homemade or store-bought dough, so you decide how much effort to put in.
Ingredients You’ll Need

Here’s a complete list of what you’ll need for both the cookies and the decorations.
For the Cookies
- 1 batch of sugar cookie dough (homemade or store-bought)
- Green gel food coloring
- All-purpose flour (for dusting)
For the Decoration
- 1 tub vanilla or white buttercream frosting
- Black gel food coloring or black edible decorating gel
- Candy eyeballs
- Chocolate sprinkles or jimmies (optional)
Step-by-Step Instructions: Baking and Decorating Frankenstein Cookies
Follow these simple steps to bring your edible monsters to life.
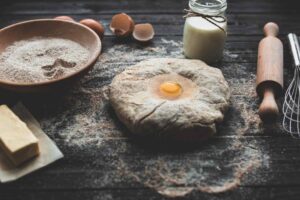
Step 1: Prepare and Color the Dough
Start by preparing your sugar cookie dough. If you’re making it from scratch, chill it slightly before coloring. Add several drops of green gel food coloring and knead until the dough is evenly tinted. Gel food coloring is preferred over liquid because it creates a more vibrant and consistent color without changing the dough’s texture.
Step 2: Shape Your Frankenstein Cookies
Lightly flour your work surface and roll the dough out to about ¼ inch thick. Use a square or rectangular cookie cutter for a classic Frankenstein shape. If you don’t have one, a ruler and a pizza cutter work perfectly well to create neat edges.
To add Frankenstein’s iconic “neck bolts,” roll two small balls of dough and attach them to each side of the rectangle about three-quarters of the way down.

Step 3: Bake and Cool
Transfer your shaped cookies to a parchment-lined baking sheet and bake according to your recipe instructions, typically at 350°F (175°C) for 8–10 minutes, or until the edges are just turning golden.
Once baked, allow the cookies to cool completely on a wire rack. Decorating warm cookies can cause frosting to melt and ruin the details, so patience is key here.
Step 4: Frost the Base
Once cooled, spread a thin, even layer of green buttercream frosting over each cookie. This forms the base of Frankenstein’s face. A small offset spatula or butter knife works well here. If you’d like to make your frosting from scratch, you can tint it green with gel coloring just like the dough.
Step 5: Add the Hair
For Frankenstein’s classic flat-top hair, place a small strip of parchment paper across the top third of the cookie to block it off. Sprinkle chocolate jimmies over the exposed frosting. Once covered, gently tap the cookie to remove excess sprinkles and lift the parchment — you’ll have a clean hairline.
Step 6: Place the Eyes
Use a tiny dab of frosting or decorating gel to attach two candy eyeballs below the hairline. This instantly brings the cookies to life and adds character. For a fun twist, position the eyes slightly unevenly to give each Frankenstein a unique expression.
Step 7: Pipe the Final Details
Now it’s time for the finishing touches. Using black edible decorating gel, pipe on:
- A jagged hairline just below the sprinkle section
- A mouth near the bottom of the cookie (straight or crooked)
- A few stitch lines across the mouth
- Optional: a scar on the forehead
These details give your Frankenstein cookies personality and charm.
Quick Comparison: Dough vs. Decoration Breakdown
Here’s a quick overview of the two main parts of the recipe:
| Step | Focus | Key Tips |
| Baking | Shape and bake sugar cookies with green-colored dough | Chill dough for easier shaping and vibrant color |
| Decorating | Frost, sprinkle, and detail to create Frankenstein’s face | Let cookies cool fully before decorating |
Expert Tips for Perfect Frankenstein Sugar Cookies
Even though this Halloween sugar cookie friendly Frankenstein recipe is simple, a few pro tips can make a big difference:
- Chill your dough: 20–30 minutes in the fridge helps prevent spreading during baking.
- Use gel coloring: Liquid food coloring can make the dough too wet and less vibrant.
- Let cookies cool completely: Decorating warm cookies leads to melted frosting and smudged details.
- Practice piping on parchment first: A few test stitches will help you feel confident before decorating your cookies.
- Add personality: Slight variations in scars, hairlines, or expressions make each cookie unique and fun.
Storage and Make-Ahead Options
These cookies store well and can even be made ahead of time. Once decorated, let the frosting set completely before storing.
- Room temperature: Store in an airtight container for up to 5 days.
- Freezer: Freeze undecorated cookies for up to 3 months. Thaw before decorating.
- Transporting: Place a sheet of parchment between layers to prevent smudging if stacking.
Creative Variations to Try

Once you master the classic Frankenstein design, try adding your own twist:
- Monster Family: Use different food coloring for purple, orange, or blue monsters.
- Mini Frankensteins: Cut smaller squares for bite-sized treats.
- Glow-in-the-dark style: Use neon green frosting or edible glitter for a fun glow effect under blacklight.
- Name tags: Pipe names or initials on each cookie for personalized party favors.
These variations keep the project fresh year after year and make it easy to tailor for different ages and occasions.
FAQs About Halloween Sugar Cookie Friendly Frankenstein Recipe
Q1: Can I use store-bought dough for this recipe?
Absolutely. Store-bought sugar cookie dough works perfectly. Just remember to mix in the green gel food coloring thoroughly before shaping and baking.
Q2: How far in advance can I make these cookies?
You can bake the cookies up to three days ahead and store them in an airtight container. If freezing, do so before decorating and add frosting and details once thawed.
Q3: What can I use instead of candy eyes?
If you don’t have candy eyes, pipe small white frosting dots with tiny black centers or use mini chocolate chips.
Q4: My frosting keeps melting. What’s going wrong?
This usually happens if the cookies are still warm. Always ensure they’re completely cooled before decorating to keep details crisp and clean.
Q5: Can I make these cookies gluten-free?
Yes. Swap in your favorite gluten-free sugar cookie dough recipe or mix, and follow the same instructions.
Bringing It All Together: Your New Halloween Baking Tradition
This Halloween sugar cookie friendly Frankenstein recipe is more than just a dessert — it’s a seasonal tradition waiting to happen. With their goofy faces, sprinkle hair, and charming scars, these cookies bring personality and fun to any Halloween table. They’re simple enough for kids to decorate but impressive enough to delight adults, too.
So whether you’re hosting a Halloween party, sending treats to school, or just spending a cozy afternoon in the kitchen, these Frankenstein cookies are the perfect way to celebrate. Once you’ve made them once, they’re sure to become a yearly favorite — one that your family and friends look forward to every spooky season.